

Thursday, May 3, 2012
Interlude: New Gauntlet Pattern
Monday, April 30, 2012
Hat Tricks IV: A Ridge to Nowhere?
OK, so...I have once again terribly neglected my poor little blog. What can I say? I really have no excuse here so I'm not even going to pretend. On with the show!
The next thing I do after making the two helmet halves is to make a central ridge piece to join them together. This type of thing can actually be found in many extant, period examples from different cultures. The spangenhelm is sort of an example but a more direct example would be the Japanese kabuto, particularly the zunari kabuto. A zunari kabuto was typically a constructed helmet that had two side plates that formed the skull joined by a central ridge plate. The rivets were usually ground flush with the surface and all lames heavily lacquered with the very nasty, toxic urushi lacquer. (Seriously, you can get a rash from this stuff). But who doesn't want to suffer for their art, right?
In this post, I've included several pics of a helm I'm working on now for a friend of mine.


 Now, here's the thing about the central ridge; it needs to match the profile created where the two helmet halves meet. (You've probably already guessed that but I point it out because it wasn't obvious to me the first time I tried to make one of these things).
For the European-type, constructed helms I've been making recently, I cut a strip of metal for the central ridge that is about 1.5 inches wide and long enough to cover the entire seam where the two cranium halves meet. The strip will actually be longer than I need so I can cut it to the proper length when I finally settle on the other design elements. And, if you happen to have a shear, it's fairly easy to cut the ridge after it has been formed. Also, you may notice that the ridge is fairly narrow. This is another reason why it's important to make sure that the helmet halves match up nicely, meeting closely with as little gaping as possible. :)
Once the ridge strip is cut and de-burred, I dome it in the same dish that I used to make the helmet halves. When you begin to dome the piece, it will have the tendency to curl up on itself but can usually be uncurled by hand, providing the gauge is not too thick.
After the ridge strip is sufficiently domed, I tape the two helmet halves together with duck tape (yes, I know it's actually 'duct tape' but I really like the thought of this stuff being produced by industrious mallards). Now, I bend the ridge strip, by hand, to conform to the profile of the temporarily joined halves, adjusting by hammer as needed. If your two halves form a peak when they meet, the ridge will not seat properly, if you want to keep the peak look. Not to worry, that's what the next step is for!
Mark a line through the center of the ridge. This is probably a little easier before forming but, sometimes, the forming process can erase marking lines. For the marking process, I usually prefer to use masking tape and a sharpie marker. Once the central ridge is marked, you can use a creasing stake or a chisel held in a vice (or a combination thereof) to raise a crease down the center. I use the word "raise" here because I kind of feel like that is what is happening when you begin to put a crease in a piece and also because I use a raising hammer for this.
A note on creasing: Creasing is a technique that can require a bit of practice to get the hang of. Basically, you hold the piece over your stake, as exactly as you can to the line that you have marked that will become the crease itself. I hold the piece at a bit of an angle...we'll say about 30° or so. With a raising hammer, I then begin striking on one side of my line, raising what may first appear as a series of bumps along the line that I marked. I then repeat this process on the other side. What is actually happening is that the metal directly over the creasing stake/chisel remains where it is, at the same height and you are actually hammering the metal alongside, making it lower than the metal over the stake. Another way to help start the crease is by marking the lines on the inside of the piece, lay it on a wooden block, hold the chisel on the line that you have marked and give it a good smack with a hammer. Follow the line you have marked, moving your chisel about half the distance of it's contact with the metal. It may take a while, but the result will be that you can now see, on the reverse side, where your lines should be and your crease has been started.
Refine your crease until it is as sharp as you want it, taking care not to cut a line right through your piece. Also, remember to check the profile and fit of the ridge piece by periodically placing it on the two helmet halves. If it doesn't fit and seat well, this whole party will have been for nothing!
Now, once we have our crease laid in, how do we finish it? Enter: The flap wheel!

This is a 120 grit flap wheel made for grinding metal and it is attached to an angle grinder. I got it at Home Depot for about $7 or $8 bucks. Lowes and other hardware folk have also been known to carry them.
Taking the proper safety precautions (gloves, goggles, hearing protections, filter mask) I use the edge of the flap wheel to grind up to the crease. Try not to cross over the crease when you grind because this can make it less sharp and crisp whereas grinding "up to the line" can help to sharpen and define it.
After the ridge is finished and cut to length, you can then define the spacing for the holes and punch them. Once the holes in the ridge are punched, match it to the two halves of the helm and mark through the holes to transfer their location onto each half. (Once again, this is why it is very important for pieces of any constructed project to fit together well).
Punch/drill out the holes in each half of the cranium plates and you're ready to bolt the pieces together to check fit and do any necessary tweaking.
Finishing up: I'm sure there are things that I've left out and things that may need clarified. I will (hopefully) tackle those in upcoming posts so, if you see anything like that, please, feel free to comment or send me an e-mail. Until next time, happy hammering!
The next thing I do after making the two helmet halves is to make a central ridge piece to join them together. This type of thing can actually be found in many extant, period examples from different cultures. The spangenhelm is sort of an example but a more direct example would be the Japanese kabuto, particularly the zunari kabuto. A zunari kabuto was typically a constructed helmet that had two side plates that formed the skull joined by a central ridge plate. The rivets were usually ground flush with the surface and all lames heavily lacquered with the very nasty, toxic urushi lacquer. (Seriously, you can get a rash from this stuff). But who doesn't want to suffer for their art, right?
In this post, I've included several pics of a helm I'm working on now for a friend of mine.


For the European-type, constructed helms I've been making recently, I cut a strip of metal for the central ridge that is about 1.5 inches wide and long enough to cover the entire seam where the two cranium halves meet. The strip will actually be longer than I need so I can cut it to the proper length when I finally settle on the other design elements. And, if you happen to have a shear, it's fairly easy to cut the ridge after it has been formed. Also, you may notice that the ridge is fairly narrow. This is another reason why it's important to make sure that the helmet halves match up nicely, meeting closely with as little gaping as possible. :)
Once the ridge strip is cut and de-burred, I dome it in the same dish that I used to make the helmet halves. When you begin to dome the piece, it will have the tendency to curl up on itself but can usually be uncurled by hand, providing the gauge is not too thick.
After the ridge strip is sufficiently domed, I tape the two helmet halves together with duck tape (yes, I know it's actually 'duct tape' but I really like the thought of this stuff being produced by industrious mallards). Now, I bend the ridge strip, by hand, to conform to the profile of the temporarily joined halves, adjusting by hammer as needed. If your two halves form a peak when they meet, the ridge will not seat properly, if you want to keep the peak look. Not to worry, that's what the next step is for!
Mark a line through the center of the ridge. This is probably a little easier before forming but, sometimes, the forming process can erase marking lines. For the marking process, I usually prefer to use masking tape and a sharpie marker. Once the central ridge is marked, you can use a creasing stake or a chisel held in a vice (or a combination thereof) to raise a crease down the center. I use the word "raise" here because I kind of feel like that is what is happening when you begin to put a crease in a piece and also because I use a raising hammer for this.
A note on creasing: Creasing is a technique that can require a bit of practice to get the hang of. Basically, you hold the piece over your stake, as exactly as you can to the line that you have marked that will become the crease itself. I hold the piece at a bit of an angle...we'll say about 30° or so. With a raising hammer, I then begin striking on one side of my line, raising what may first appear as a series of bumps along the line that I marked. I then repeat this process on the other side. What is actually happening is that the metal directly over the creasing stake/chisel remains where it is, at the same height and you are actually hammering the metal alongside, making it lower than the metal over the stake. Another way to help start the crease is by marking the lines on the inside of the piece, lay it on a wooden block, hold the chisel on the line that you have marked and give it a good smack with a hammer. Follow the line you have marked, moving your chisel about half the distance of it's contact with the metal. It may take a while, but the result will be that you can now see, on the reverse side, where your lines should be and your crease has been started.
Refine your crease until it is as sharp as you want it, taking care not to cut a line right through your piece. Also, remember to check the profile and fit of the ridge piece by periodically placing it on the two helmet halves. If it doesn't fit and seat well, this whole party will have been for nothing!
Now, once we have our crease laid in, how do we finish it? Enter: The flap wheel!

This is a 120 grit flap wheel made for grinding metal and it is attached to an angle grinder. I got it at Home Depot for about $7 or $8 bucks. Lowes and other hardware folk have also been known to carry them.
Taking the proper safety precautions (gloves, goggles, hearing protections, filter mask) I use the edge of the flap wheel to grind up to the crease. Try not to cross over the crease when you grind because this can make it less sharp and crisp whereas grinding "up to the line" can help to sharpen and define it.
After the ridge is finished and cut to length, you can then define the spacing for the holes and punch them. Once the holes in the ridge are punched, match it to the two halves of the helm and mark through the holes to transfer their location onto each half. (Once again, this is why it is very important for pieces of any constructed project to fit together well).
Punch/drill out the holes in each half of the cranium plates and you're ready to bolt the pieces together to check fit and do any necessary tweaking.
Finishing up: I'm sure there are things that I've left out and things that may need clarified. I will (hopefully) tackle those in upcoming posts so, if you see anything like that, please, feel free to comment or send me an e-mail. Until next time, happy hammering!
Monday, April 2, 2012
Hat Tricks Part III: The Grinder of Skulls
Been a bit since I last posted. Sorry about that but I was...well...making armor! My apology is something along the lines of "Never trust a skinny cook."
Anyway, the third stage of my helmet building procedure is to "grind in" the cranium halves I've made so that there is as little gaping as possible along what will be the center line of the helmet skull (cranium, melon top, etc.).
I do this by placing the halves together and, wherever they touch, I draw a line across where the point of contact starts and another where it ends. This line will be perpendicular to the center line of the skull and should be on both of the pieces you have made. This tells me where I need to grind. The idea is that wherever the helmet halves meet are the high spots and these should be ground down to reduce the gaping. I try to grind equally on both sides. After each pass of grinding, the two halves are brought back together and lines are renewed or added as necessary. *A word of caution: do this bit very slowly and methodically as it can be quite easy to take off too much material with a grinder. The pieces pictured below are nearly at the end of the grinding stage but the lines from the process can be seen in the picture.
 The next picture shows what the halves look like before the start of this process.

The next part of the process will be to make the central ridge which will cover this seem and join the two halves together. This whole operation might seem a little tricky but, once you get the hang of it, it's a nice way to produce a usable helmet with no welding required.
Anyway, the third stage of my helmet building procedure is to "grind in" the cranium halves I've made so that there is as little gaping as possible along what will be the center line of the helmet skull (cranium, melon top, etc.).
I do this by placing the halves together and, wherever they touch, I draw a line across where the point of contact starts and another where it ends. This line will be perpendicular to the center line of the skull and should be on both of the pieces you have made. This tells me where I need to grind. The idea is that wherever the helmet halves meet are the high spots and these should be ground down to reduce the gaping. I try to grind equally on both sides. After each pass of grinding, the two halves are brought back together and lines are renewed or added as necessary. *A word of caution: do this bit very slowly and methodically as it can be quite easy to take off too much material with a grinder. The pieces pictured below are nearly at the end of the grinding stage but the lines from the process can be seen in the picture.


Friday, March 23, 2012
Hat Tricks Part II: The Dishening!
Tonight continues the series on helmet making. This is probably my least favorite part of the whole process: dishing the two halves of the cranium or, as I call it, the Dishening! But, anyway, here's how I do it and I'll start with a picture of the tools involved. Let the Dishening commence!
 They are, from left to right: The large, split head, Garland rawhide hammer, the #2 Garland rawhide hammer, and a metal dishing form which I believe was also made by Iron Monger.
Once I mark and cut the steel from my pattern piece, I then file the edges for safety. These edges won't be contacting the wearer so I just try to make them smooth enough so that the piece I'm working with is safe to handle.
Now comes the part I really hate and that is beatin' the dickens out of the cranium halves until they conform to the shape of the dish. I hate it because it's a lot of work but sometimes it's good for letting go of some frustrations so, in a way, it can be therapeutic. As you may have guessed, I start with the large Garland mallet and work my way to the smaller one. I begin by placing the center of my steel piece over the center of the dish and striking with medium force. (If you start with maximum force, you may get a call from the Jedi council). I work my way from the center to the outer edges in what is more or less a spiral pattern. With each successive pass, I increase the force just a bit. There will come a point where the face of the large hammer is too big to press the metal down into the convex form any more than it already has. It is at this point that I switch to the smaller hammer to finish the rough dishing process.
A note about the equipment: These metal dishes are great if you can get one. If not, creating a dish in a stump would probably work just as well. The nice thing about the metal form is that its surface should already be fairly uniform all the way around. With the stump, you will probably have to work with it and scrape/sand/beat it for a while to get the result you're looking for. Using this metal form, sometimes I feel like I'm cheating.
One thing to watch out for when dishing is buckling at the edges of your piece. Below is an example.
 When this happens, place the edge of the piece on the edge of your form or on an anvil and hammer the buckle flat before it becomes larger or creases.
During this whole ordeal, I find it's best to pace myself and take breaks in between passes. This is probably also the chief reason why my right arm is bigger than my left one. Below is a picture of the piece near the end of the rough dishing.
 If you can bring yourself to do this twice, you may end up with something that looks like this:
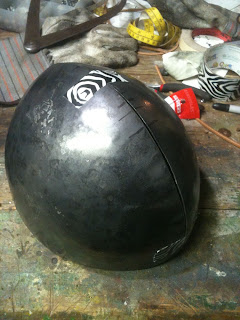
 You'll notice that there's quite a lot of gaping between the two halves. Not to worry because they have to be trimmed and "ground in" before they really start to resemble the top of a helmet. I'll go into this process in more detail in the next post but for now, I'll leave you with a pic of what the halves look like near the end of this stage. Zebra print duck tape has been added for extra flair.


Once I mark and cut the steel from my pattern piece, I then file the edges for safety. These edges won't be contacting the wearer so I just try to make them smooth enough so that the piece I'm working with is safe to handle.
Now comes the part I really hate and that is beatin' the dickens out of the cranium halves until they conform to the shape of the dish. I hate it because it's a lot of work but sometimes it's good for letting go of some frustrations so, in a way, it can be therapeutic. As you may have guessed, I start with the large Garland mallet and work my way to the smaller one. I begin by placing the center of my steel piece over the center of the dish and striking with medium force. (If you start with maximum force, you may get a call from the Jedi council). I work my way from the center to the outer edges in what is more or less a spiral pattern. With each successive pass, I increase the force just a bit. There will come a point where the face of the large hammer is too big to press the metal down into the convex form any more than it already has. It is at this point that I switch to the smaller hammer to finish the rough dishing process.
A note about the equipment: These metal dishes are great if you can get one. If not, creating a dish in a stump would probably work just as well. The nice thing about the metal form is that its surface should already be fairly uniform all the way around. With the stump, you will probably have to work with it and scrape/sand/beat it for a while to get the result you're looking for. Using this metal form, sometimes I feel like I'm cheating.
One thing to watch out for when dishing is buckling at the edges of your piece. Below is an example.

During this whole ordeal, I find it's best to pace myself and take breaks in between passes. This is probably also the chief reason why my right arm is bigger than my left one. Below is a picture of the piece near the end of the rough dishing.


Wednesday, March 21, 2012
Hat tricks.
OK, I didn't post last night because, well....I didn't feel like it. (Just being honest :) Tonight however, I begin a series of posts on what can seem like one of the most daunting tasks for the beginning to intermediate armorer; helmet making! (At least, it was a pretty big deal for me starting out).
So, next, I'll present to you the way that I make a helmet. I'm not saying this is the only way or even the right way, just my way...YMMV. The kind of helmets I use this method for are constructed of multiple pieces, including the cranium, and riveted together. All of the helmets I've pictured so far in this blog have been made using this method.
The first thing I do is take some measurements. These are:
A. Head circumference
B. Head diameter, front to back
C. Head diameter, side to side
D. Distance from top of head to bottom of chin
E. Distance from point of nose to back of the head
F. Distance from top of head to the eye line
Right, so here are the pieces of information we need but, how do we get them? Enter the cloth tape measure and caliper.
 The metal pincer thingy is a caliper. This one is probably an old, outside transfer caliper. You can sometimes find these at a flea market or garage sale. If push comes to shove, you could make one out some fairly thin plywood or sheet metal. Thick plastic sheet would also work, if you just happen to have some handy.
The coiled up thing in the middle is a regular old cloth tape measure that you can pick up at Wally World for a couple of bucks.
To get the head circumference, simply wrap the cloth tape around the head, at what looks to be the widest part. This is usually just above the eye brows.
Now we use the caliper to measure the front to back diameter (distance) and the side to side distance. To these measurements, I add approximately 1" to 1-1/2" to allow for padding material. I don't add any to the circumference measurement but simply use that measure as a target to let me know if I'm in the right range.
The last measurement I usually take is from the top of the head to the bottom of the chin, once again, with the caliper. This will give us a target for how tall the helmet needs to be. Lately, I found E and F to be optional measurements but getting the distance form the point of the nose to the back of the head can be fairly important, especially if we don't want our client's helmet to come smashing into their nose when they get hit. Ouch.
I almost forgot, measure your calipered distances, lay your caliper on a ruler and measure the distance between the points. This may be obvious to almost everyone but I've known myself to overlook things like that quite frequently and then have one of those "Well, duh!" moments.
This next bit is where my method will seem to take a flying leap from the path of logic. I have a pattern piece that I start with for the helmet top and size down appropriately. I've found that this works fairly well to fit most folks, unless they would have an exceptionally large melon. Here's what my pattern for half of a helmet top looks like:

So, next, I'll present to you the way that I make a helmet. I'm not saying this is the only way or even the right way, just my way...YMMV. The kind of helmets I use this method for are constructed of multiple pieces, including the cranium, and riveted together. All of the helmets I've pictured so far in this blog have been made using this method.
The first thing I do is take some measurements. These are:
A. Head circumference
B. Head diameter, front to back
C. Head diameter, side to side
D. Distance from top of head to bottom of chin
E. Distance from point of nose to back of the head
F. Distance from top of head to the eye line
Right, so here are the pieces of information we need but, how do we get them? Enter the cloth tape measure and caliper.

The coiled up thing in the middle is a regular old cloth tape measure that you can pick up at Wally World for a couple of bucks.
To get the head circumference, simply wrap the cloth tape around the head, at what looks to be the widest part. This is usually just above the eye brows.
Now we use the caliper to measure the front to back diameter (distance) and the side to side distance. To these measurements, I add approximately 1" to 1-1/2" to allow for padding material. I don't add any to the circumference measurement but simply use that measure as a target to let me know if I'm in the right range.
The last measurement I usually take is from the top of the head to the bottom of the chin, once again, with the caliper. This will give us a target for how tall the helmet needs to be. Lately, I found E and F to be optional measurements but getting the distance form the point of the nose to the back of the head can be fairly important, especially if we don't want our client's helmet to come smashing into their nose when they get hit. Ouch.
I almost forgot, measure your calipered distances, lay your caliper on a ruler and measure the distance between the points. This may be obvious to almost everyone but I've known myself to overlook things like that quite frequently and then have one of those "Well, duh!" moments.
This next bit is where my method will seem to take a flying leap from the path of logic. I have a pattern piece that I start with for the helmet top and size down appropriately. I've found that this works fairly well to fit most folks, unless they would have an exceptionally large melon. Here's what my pattern for half of a helmet top looks like:

I label one side "A" and the other, as you may have guessed "Fred." Just kidding, the other side is in fact "B." Although this pattern may look symmetrical, I can assure that it is not. When I trace the side marked "A", I write an "A" on the tracing I've just done on the steel. I do the same thing with the "B" side and once the pieces are cut out, I dish them with the letters facing me. This lets me know that I am making two different sides for my helmet top instead of two of the same.
Tomorrow, I'll go into more detail about the pattern piece and the dishing process. G'night, folks!
Monday, March 19, 2012
Rivet for effect.
Anyway, for the first post after the weekend break, I thought I'd start off small. About the size of a rivet to be exact. Rivets make the rockin', armor world go round but most folks probably don't give them a lot of thought unless they're trying to bash one closed. (To tell the truth, I didn't either when I just started out.)
Recently, I've just tried an enhancing technique with rivets that I've been wanting to do for some time now. I was starting to put together my gorget the other day and all I really had left were the aluminum, truss-head rivets (large, round, slightly convex head) that I used when constructing my brigandine. "I'll just use these" says I. When I put one of the rivets in place to see how it looked against the steel, it was rather plain looking. Just then, an idea suddenly appeared as a tiny speck on the vacant horizons of my mind. It was running at top speed and screaming at the top of it's lungs, trying desperately to make itself known before I lifted my hammer. "Why don't you file a design into the rivet?" it said, panting and wheezing before it collapsed upon the dusty mental landscape.
"What a splendid idea" I thought, and so that's just what I did! Here's how:
I started by clamping an aluminum, truss-head rivet in a pair of vice grips. Next, I grab my triangular file and begin to score a line across the rivet head trying very carefully to stay in the center.

This being done, I then turn the rivet approximately 90° and repeat the process. There should now be a cross mark on the top of the rivet head.


Now, here's the last bit that I think makes it look really neat: On the outer edge of the rivet head, using the line I've already filed as a guide, I turn my file at a sharp angle, almost vertical so that's it's parallel to the rivet shaft, and make a little notch. The end result kind of looks like a flower or pinwheel.


That's all for tonight, friends. Happy riveting!
Friday, March 16, 2012
This helmet comes with a mustache.

This helm is constructed entirely of 16ga. mild steel. This is significant because I've noticed a growing trend toward thicker gauges in helmets these days. As many of you probably know, 16ga. is the bare minimum of thickness when it comes to head protection for most reenactment societies. There are arguments that mass is a consideration when designing a defense for the head. I tend to agree. After all, what we are trying to protect the head from is blunt-force trauma, from what is essentially a club, being swung at speed. There are many that think 16ga. is too thin and that mild steel dents too easily. Once again, I tend to agree. However, keep in mind, wherever the steel overlaps it is twice as thick. With this being the case, such as in the helm pictured above, I'm now using lighter, cheaper materials and effectively doubling the strength and protection in certain areas. At least I'm hoping this is the case as this helmet has not been fully tested yet. (If it turns out not to be the case, I'll be sure to let you know :) Also keep in mind that any crease or bend you hammer into the metal makes it stronger.

Here's a pic of the helmet I recently constructed for myself. It's made along the lines of a simple barbuta and, once again, with the laminated 16ga. construction. I've tried something different with this helm. You can't really tell by looking at the outside, but I've riveted extra plates to the inside cranial area.

This is a pic of the inside showing the extra plating. It does make the helm a little heavier but not unbearably so. You can hardly see them from the outside because I countersunk each of the rivet holes from the outside and ground the protruding rivet shank even with the surface of the helmet after closing them. The final step is to buff the area around the rivet closure with some 80 grit Satin Glo.
This is what I'm currently experimenting with. Our first fighter practice of the season should be this Sunday, weather permitting. I'll let you know how it goes. I'll leave you this evening with a few more shots of the mustache helm.


Thursday, March 15, 2012
Armor Bits 'n Bobs
When I first started out, I hadn't a clue where to find informational resources on armoring or where to get materials and supplies. So, in order to make it easier for some of you out there, tonight I offer a bit of a resource list. While not an exhaustive directory, hopefully it will be enough to get you started. Also, I'd just like to point out, none of these folks have paid me for any kind of endorsement whatsoever. I plug them here only because I have personally used there info, products and/or services and believe them to be exemplary.
Information about arms & armoring: techniques, tutorials, discussion, etc.
Information about arms & armoring: techniques, tutorials, discussion, etc.
- Techniques of Medieval Armour Reproduction, The 14th Century by Brian R. Price I found this book to be enormously helpful starting out. There are wonderful photographs of period examples, articulation theory and design, instructions for basic techniques and step by step instructions for some specific projects. Even if the 14C isn't your particular time period of interest, this book is still a great source of information about armoring in general.
- The Armour Archive - www.armourarchive.org - This is a great site with tons of useful info (tutorials, articles, etc.) They also have a section with patterns that anyone can download for free.
- myArmoury.com - Just go to the site. If you're interested in sword and armor and you haven't been there before, your eyeballs might just pop right out of your head.
- www.albion-swords.com - These guys make excellent swords, of which I happen to own several. I've talked to Mike Sigman several times and he, and the rest of the staff, made my dreams of owning a real sword come to life. Also, it might seem funny to include this site in a list about resources for armoring but remember, when making real armor, swords are one of the weapons we are trying to protect ourselves from. Also, if you're interested in making armor, it's probably not a far leap to say you're interested in swords as well. Just sayin'.
Supplies for armoring
- I get all my rivets from these folks: www.rjleahy.com Their customer service is great and if there is a problem with my order, they call me, tell me about it, and ask me where I want to go from there. Thanks, Russell! You are the man!
- You can order small quantities of sheet metal, as well as a lot of other stuff, from MSC Industrial - www1.mscdirect.com
- www.onlinemetals.com This site is great for small orders of sheet metal and I've always gotten good customer service from them.
- For polishing, I use a compound call Satin Glo made by the Formax Co. and I get it from Midway USA - www.midwayusa.com
- For all things leather: Strapping leather, armor leather, buckles, tooling, dyes, etc. - www.tandyleatherfactory.com
- www.piehtoolco.com - I've purchased several Peddinghaus hammers and abrasive belts for my grinder from these fine folks. I've had questions before about whether or not something was in stock and they've checked their warehouse for me. Very good customer service.
- Otto Frei has a great selection of stakes. They're expensive but very worth it. - www.ottofrei.com
- For putting holes in steel, I mostly rely on my punch from Roper Whitney, commonly referred to as a "Whitney Punch." You can walk rite up to their website and order one. - www.roperwhitney.com
So there you have it! Like I said, not an exhaustive list but that should get you on the road to being a real "hammer-head."
Wednesday, March 14, 2012
Lies and hammers...And in that order, too!
So, you want to be an armorer? Great! The tools are cheap, it's really easy, you'll never break a sweat, and, best of all, chicks dig it! The previous statement is a horrible lie, so, if the exact opposite of all that sounds good to you then, by all means, read on!
Let's start with the first part of my opening fairy tale: The tools. The sad part is the tools aint cheap at all and, believe me, I wish it weren't so. The upside of expensive is the fact that you get what you pay for and having the right tool not only makes a difficult job safer and easier but can sometimes be a deciding factor between success and failure.
The first "right tool" to use is your brain. If something seems like a bad idea, it probably is. Case in point: I once tried to bend a short piece of bar stock by placing it in a shallow metal dish and striking it squarely with a ball peen hammer with nothing more holding it in place than good intentions. To my amazement, the part flew out of the dish and disappeared. I looked around for about 15 minutes or so and finally gave up and cut a new piece. For whatever reason, I later chanced to look up at the 12 foot ceiling of the shop I was in. There was my missing piece of bar stock, embedded in the foam insulation on the ceiling to nearly half its length. I was very thankful that it hadn't hit me in the face. Though it might have been an improvement in some ways, I was pretty used to where my eyes and teeth were situated. Remember, there is no more important shop safety rule than to wear you shop safety glasses. (That one was for you, Norm!)
Anyway, let's talk about some tools you may not already have, starting with the hammers.

From left to right, these are: ball peen hammer, Peddinghaus hammer I've forgotten the name of, embossing/Dishing hammer, large, round-faced planishing hammer (Peddinghaus), raising/forming hammer (Peddinghaus), raising hammer purchased from Iron Monger, small-faced planisher (Peddinghaus), large Garland rawhide mallet, small #2 Garland rawhide mallet.
To an armorer, a good hammer is almost worth its weight in gold and the right hammer for the job makes all the difference in the world.
The ball peen hammer is easy enough to find at Lowe's or you local hardware store and will probably run you in the neighborhood of $8-10. I use the ball peen for closing rivets and the other face for some bouging, some planishing, at certain stages of rolling edges, and as a starter hammer for flatting the ends of bar stock. In short, it's just a good all-around hammer to have on hand. Keep in mind that the hemispherical head of the ball peen pushes the metal in ALL DIRECTIONS, making small, hemispherical dings. This is precisely why I like it for closing rivets.
The Peddinhaus-hammer-I've-forgotten-the-name-of looks like it has a cross peen on one end, I hardly ever use it and I honestly can't remember why I bought it in the first place...huh. I think it was on sale...maybe?
The third hammer in the picture I do use for dishing though, honestly, it winds up in my vise and is more often than not used for a small ball stake. I think I paid about $20-30 for it several years ago.
The next hammer is a large, round-faced planisher. I usually prefer this one for planishing. It is a Peddinghaus and will run you around $35-40. You can find similar hammers for cheaper. When planishing, the large, flat face of this hammer is good for creating small facets on a piece to make the surface more uniform (Like the polygon faces on a 3D model). Later, these faces will be ground smooth producing a smooth, uniform surface or contour. (Like adding a mesh-smooth modifier in 3D Studio Max ;)
The next hammer is my favorite. It's a Peddinghaus raising/chasing hammer and I use it for all kinds of forming operations. I paid around $40 for this one and it's been worth every penny. It's true that Peddinghaus hammers are more expensive but I'm a believer in their quality. Raising is a process that I'll cover in depth later but, for now, think of it like stretching the metal over a stake (positive form) kind of like when you try to poke your finger through a plastic bag or wrapper only to find out than it was stronger than you thought and just stretches to conform to your finger. Instead of poking the metal with our finger, we're going to hit it with a hammer. Don't worry, I'm kinda confused too but it'll be OK.
The sixth in the line up is another raising hammer, this one a little larger. I also purchased this one from Iron Monger and it is very useful and also a quality tool.
After that we have the small, round-faced planisher. You can't see it in this picture but the face on one of the ends is slightly convex. I often use this to help pop out dents from the inside of a piece. Again, another $30-40 hammer.
The last two are made by the Garland Manufacturing Co. and are replaceable-face, rawhide hammers, not mallets (There is a difference). These are wonderful things, friends. I use them to start dishing helmet halves and sometimes to start rolling an edge without marring the metal. The small hammer was about $20 and I think I paid $40 for the big one.
Closing remarks: Common sense, safety glasses, the right tool for the job, some of these hammers are really friggin' expensive! G'night folks!
Tuesday, March 13, 2012
More guidelines than rules....
When I started armoring, I had no one to teach me so I had to learn all I could from books, articles, pictures, and a lot of plain old trial and error. (Mostly error). Through this process, there are some principles of armor design and construction which have become evident to me and I thought it might be helpful to lay them out here.
- Armor should be as protective as possible while inhibiting movement as little as possible.
I know, "Well, duh!", right? This is just a basic rule to guide you through the logical process of designing or reproducing a piece. It's a bit of a trade off though. Sometimes compromises will have to be made one way or the other. This might mean decreasing or increasing the size of a plate to accommodate a greater range of motion in a critical area or knowing which pieces should be made of thicker stock and where to place them.
Another key piece of this principle is that armor was tailored to the individual. I remember a set of 7 lame, 16ga. legs I wore as part of my first armor. They were beautifully made, very heavy, and sized for someone with larger legs than I own. One time, in a field battle, (yes, I know how that sounds) I was running back out onto the field when my legs came to close together and the lames around the knees of either leg interlocked. Down I went. Hurt? No. Embarrassed? Yes, very much, thanks.
- Look at period examples. Armorers did it that way for a reason.
One example I like to think of, which kinda goes hand in hand with the above principle, is a period breast plate from the 15th century vs. many of the modern ones worn by reenactors. Those worn by reenactors often have either side, near the arm pits, cut in toward the center to allow the arms to move in toward the center line without chaffing or pinching, as when holding or wielding a two handed weapon like a long sword (my personal favorite). While it's true that this does afford extra motion and comfort, it exposes more of the pectoral muscles and the area near the arm pit. To my recollection, I've not seen period breast plates that were made in this manner. (It's possible I just haven't looked at enough period armor to know). I've tried to duplicate period examples that look like they cover enough of this area. When I put on the breast plate, grabbed up me long sword and took a practice swing, OUCHY, it really did bind and pinch near my arm pits! Then, an insight from my martial arts training kicked in. I realized that when swinging a weapon with two hands, you should turn your hips into the swing, your leading shoulder following the motion which will turn you. In this manner, your arms don't come across your chest in such a static fashion. Now, having said all that, I'll say this: Reenactors usually won't have someone trying to stab their arm pits with a sharpened blade. However, this is just another reason why you should always wear deodorant.
- Keep it simple
Armoring isn't rocket surgery. When trying to figure out a pattern, a simple solution is often correct. For instance, I love a simple, one piece, late period couter for an elbow defense. I think they are elegant in both form and function. Not too long after I set about bangin' on metal, I wanted to make one but just couldn't figure out what kind of flat shape could produce such a thing. After a while, I went to an event and there happened to be an experienced armorer there so I asked him. To my surprise, he told me that the pattern was a simple egg shape. The trick was in raising the defense to the desired height and curling the part that goes toward the inside of the elbow. Who knew, right?
- Style!
OK, this one isn't so much of a principle as it is something to shoot for. If you're gonna go through all the trouble to make a nice, functional, durable piece, why not take the time to make it look like something? Some extant examples of period armor are a sight to behold. (I'm partial to the humanistic lines of the Italian armorers and the works of the Helmschmieds.) This can also be a point of frustration for the beginner. Just remember, fancier isn't always better and a poorly executed enhancing technique, like fluting or creasing, is often worse than none at all! Take your time and try to enjoy the process as much as the end result.
Well that's it for now folks. I'll post some more when the hamsters that power my computer have rested a bit. :)
Monday, March 12, 2012
First Post: This is what it is.
Hello, folks. My name is Ryan Evans and I've created this blog to share the little bits of knowledge I've gleaned from my strange hobbies with the rest of the world. My hope is that you will find this information useful or at least my pursuit thereof highly entertaining.
I've been a hobbyist armorer for about 6-7 years or more. This is one of those hobbies where you almost don't want to explain to people what it is that you do. On the other hand, sometimes it's fun because they look at you like you have lobsters coming out of your ears. Answers to some of the questions that follow the initial exchange may include, but are not limited to:
"Yes, I beat on sheets of metal and fashion antiquated defenses for martial combat."
"No, I don't do anything with guns."
"Yes, like on the history channel."
I've also been a martial artist for about 10 years and so, just for fun, you can probably expect to see some of that turn up in my posts as well.
In the posts that will hopefully follow...unless I die...or the world ends...or some such other untoward event happens...I'll most likely post tutorials, articles, essays, and maybe even a video or two on some of the ways I beet metal into interesting shapes and make stuff out of other...things. I might even wax poetic about the forgotten ways of men and women who thought it would be a good idea to don a tin suit, grab a sharpened #2 spade and have a go at life threatening combat. Or something like that. (Yes, I'm slightly crazy;)
Subscribe to:
Comments (Atom)